Step 1
Start by creating a new document. I set my size to 2320×1436 pixels.

Step 2
Start by filling the background with a brown then using the Brush tool to paint a darker shade of brown. I used the colors #A1643B and #211712 (you can set these values in the Color Picker). You can use your own colors but keep the brighter color on the outer edges and darker color in the middle.

Step 3
Next, use the Liquify tool (Filter > Liquify). Use the Forward Warp tool to randomly smudge the background like shown in the image below.

Step 4
Next, go to Filter > Distort > Twirl. Set the angle to around 368° then click OK.
Tip: Usually when you apply filters to an image you cannot go back and modify it without undoing. To overcome this, you can convert your layer into a Smart Object (Layer > Convert to Smart Object). Once your layer is a Smart Object, you can apply the filter and it will apply it non-destructively letting you edit the settings anytime you like.

Here’s what the Twirl looks like.

Step 5
Now that we’re done with our background, we can create the text. Start by using the Brush tool and draw the words “Valentine’s day” using a hard-edge brush. You can also use the Type tool and use any font you like. For this step, I will be drawing the text free-hand with the Brush tool. I used a 40px brush with a hardness of 100%.

Step 6
Go to Filter > Liquify. Warp the text to give it a melting effect like shown in the image below.

Step 7
Next, we’re going to add some layer styles to the text. Go to Layer > Layer Style > Drop Shadow and apply the settings shown below. Don’t click OK yet.

Step 8
Enable the Bevel and Emboss style then apply the settings shown below.

Click on the Gloss Contour option to bring up the Contour Editor. Create a contour like shown in the image below.

Enable the Bevel and Emboss > Contour style then adjust the Contour like shown in the image below.

Step 9
Now enable the Satin style and apply the settings shown in the image below.

Set the contour to the one shown in the image below.

Step 10
Enable the Gradient Overlay option then set the settings shown below. Click on the Gradient to bring up the Gradient Editor.

Recreate a Gradient shown below; we used the colors #6F3B14, #512E15, and #2f0D03 (from left to right)

Step 11
Finally, enable the Pattern Overlay style then apply the settings shown below.

Here’s what the text effect looks like!

Step 12
Next, we’re going to add the Happy text. For this text, I used the “Fiolex Girls” font. Use the Text tool to add the text.
To give it a chocolaty text effect, copy and paste the layer style from the Valentine’s day text to the Happy text. To do this, select the Valentine’s day text layer then go to Layer > Layer Style > Copy Layer Style. Select the Happy text layer then go to Layer > Layer Style > Paste Layer Style.

Step 13
Now we’re going to add a small heart. Download the LM Cupids font then type any picture you want using the Text tool. I typed the letter U to get the image shown below.

Step 14
Like what we did earlier, copy and paste the layer style into the heart text that we created. To do this, select any one of the text layers with the layer style then go to Layer > Layer Style > Copy Layer Style. Select back the layer with the heart then go to Layer > Layer Style > Paste Layer Style.

Step 15
Now we’re going to add a drip to the top of the image. Start by creating a new layer and position it above all the other layers. Use the Pen tool to create a shape like shown below. Right-click on the path then choose “Make Selection”. This will create a selection out of the path. Fill the selected area with brown.

Step 16
Now we’re going to copy and paste the same layer style onto the drip. Select any one of the previous layers with the layer style then go to Layer > Layer Style > Copy Layer Style. Select back the layer with the drip then go to Layer > Layer Style > Paste Layer style.
If the effect doesn’t look the way you like it, you can scale the effect by going to Layer > Layer Style > Scale Effects.

Here’s what our image looks like so far.

Step 17
Add a splatter to the bottom using the same technique we used to create the drip. To do this, create a new layer then draw the splatter with the Pen tool. Right-click on the path then choose Make Selection. Fill the selection with a brown color. Complete it by copying the layer style from another layer and pasting it into the layer with the splatter (Layer > Layer Style > Copy/Paste Layer Style).

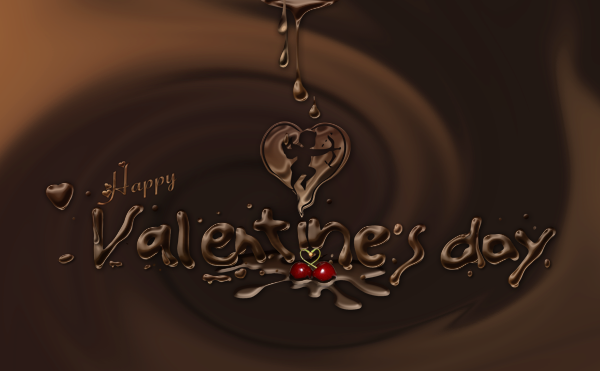
Step 18
To complete the image, draw in a few more drips using the same technique you used to create the first drip. Place the image of the cherries and you’re done!

Final Results
Don’t forget to experiment with the colors! You can add Hue/Saturation adjustment layer (Layer > New Adjustment Layer > Hue/Saturation) to adjust the colors. Place this layer above the background layer.

No comments:
Post a Comment